
To clean the EGR passages on a 2002-2004 Honda Odyssey V6, you’ll need a 10mm socket, a 12mm socket, a pair of pliers, a flat bladed screwdriver, a can or two of carb cleaner, and a roll of paper towels. Why would you want to do this? If you’ve got a random misfire you can’t run down after replacing plugs and checking coils, or just if the engine has over 200,000 miles, there’s a good bet the passages are clogged - and that will cause a range of rough running problems. So if you’re bored, or annoyed, dive on in and clean out your EGR passages! It’s fun, I promise! Even if you don’t own the van…

Yummy scrunchy carbon! Obviously, this week is a bit of automotive maintenance, and it’s not one of my vehicles. But it is an easy enough job to do if you’ve got a proper era Honda Oydssey minivan, and it’s something you really should do. I’m basing this post on a post by DaleClark over at OdyClub, who did a great job of describing the process, just without images. It’s more than enough to guide you through it if you’ve worked on engines, but the process is also a really simple, quite hard to screw up sort of thing that is a solid “slightly deeper into the engine” sort of process that you can take on if you’re even somewhat handy with tools and willing to get your hands dirty. If everything goes smoothly, it’s about an hour of work, though can easily extend further if you have to replace a few other parts while you’re in there and are photographing the process.
Engines This Applies To
Pull the plastic off the top of your engine (I’m not even sure why that stuff is in there in the first place), and if your engine has what looks like an access panel on top of the intake manifold, this applies to you! The process is simple enough: Pull the access panel with the EGR passages, pull the throttle body, remove the intake manifold, and clean stuff out. Then put it back together.

Going In: Remove the Access Panel
The first step is to remove the access panel on top of the intake manifold. This has a pair of 10mm nuts and a bunch of 10mm bolts to remove - and if you’re curious as to why the nuts, having a few locator studs makes reassembly far easier, since it plops exactly into place on the studs - I’ve not seen it before, but it’s really nice.

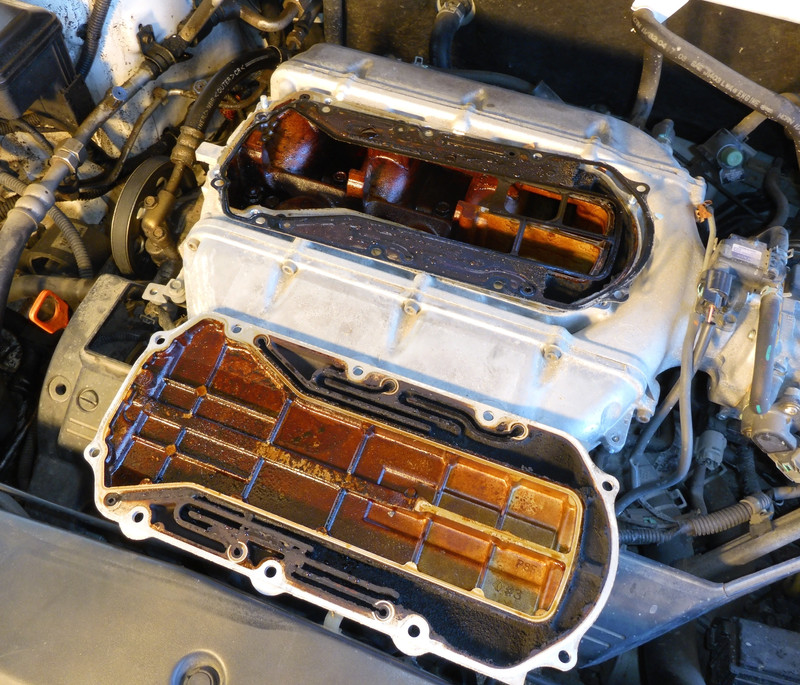
Once all the connectors are removed, the panel should pop right off - and you can see the inside of the intake manifold (the “golden brown” area, though I’ve no idea how oil gets in there), and the black, gunked up set of serpentine passages around the edges. That’s the main thing to be cleaned, and if this isn’t too bad, you might be able to get away with just cleaning out the passages here, scraping the carbon free from the lower ports in the intake manifold, and going on your way. That involves dumping a good bit of crap into the intake manifold, though, which is worth avoiding - especially given how easy the manifold is to remove.
Exhaust gas, when it needs to be recirculated, comes up from the exhaust manifold through the backwards C-shaped opening on the right, and into the access panel’s passages.

These route the exhaust gas into openings that go to the intake manifold. The “black crud in the holes” is carbon deposits from the exhaust gasses over time, and you can see that some of the passages are pretty well plugged up too. The combination of plugged passages and reduced hole diameter eventually starts causing problems, and I understand that the engine will gradually get rougher, even before it starts setting misfire codes.
I assume routing the exhaust gases through this panel is to help cool them down, and I imagine it’s quite effective at that. They just eventually start plugging things up.
The gasket comes off easily - it’s just sitting on the studs. This is the orientation as it comes off the engine - and if you’re lost later, “shiny side goes up.” The bottom is coated with a black coating that isn’t exhaust, and the top surface is shiny - though it’s likely to be black with the residue. You can also see the marks of the passages on the top side.

With the gasket removed, you can see the openings in the intake manifold - and they’re substantially plugged up too.

Removing the Throttle Body
Before removing the intake manifold, you need to pull the throttle body off the side. It’s easier to remove the throttle body from the intake manifold than it is to remove everything from the throttle body. There are a variety of electrical connections, as well as some hoses that need to be removed.

Most modern car electrical connections look like this, give or take - and they’re usually fairly easy to remove. Press down on the large tab on the right, and it will lift the latch on the left, freeing you to wiggle the connector off. Always grab it by the plastic shell when working with it - don’t pull the wires unless you’ve got a thing for replacing connectors. But with the latch lifted, they should come out fairly easily. Going back on, make sure they snap in place - and most connectors are going to be keyed so they can’t go on the wrong device. But still try to keep them in the general range of where they are.

Hose clamps come off with a pair of pliers. Squeeze, wiggle hose off/out/etc. The worm gear clamp holding the intake hose to the throttle body is just a normal screw, back it off and wiggle the tube free. And the eagle eyed will notice something very concerning about the intake hose (snorkel? apparently this is a non-standard term, but it’s what I know the rubber hose between the air filter and throttle body as).

It’s cracked. Substantially so. This is no good - it’s an unfiltered air leak, so I’m not going to put this piece back on the car.

The throttle body is held on by two 12mm nuts (top), and two 12mm bolts (bottom). Remove all four - the back one is pretty well hidden, so you may need a flashlight to find it.

Once they’re free, the throttle body should just slide off - it may need a tap with the back end of a screwdriver to persuade it, or it may just wiggle free. If the gasket is in good shape, there’s no reason you can’t reuse it. You might spray down the throttle body a bit and clean it out while it’s off. This engine has port injection - one fuel injector per cylinder. All the throttle body is doing is controlling airflow into the engine with the large throttle butterfly, and with some bypass valves to regulate idle speed (so the engine doesn’t stall when the air conditioner is on, or the power steering pump is working hard).
There’s no need to pull the throttle body very far. It just has to be clear of the intake manifold.

Removing the Intake Manifold
Look down into the intake manifold, and you’ll find a selection of 12mm bolts (and a pair of 12mm nuts - there’s really a theme in this engine assembly!) holding it on. Loosen and remove them.

Before the intake manifold will come off, you also have to remove some electrical connections and hoses from the back side - there are two hoses and one sensor back there. Once they’re off, you can start trying to lift it free, and when it hangs up on something, don’t force it. Go figure out what hose you failed to disconnect. Another pair of eyes is helpful here.

The whole thing comes off. Set it on something soft - old cardboard boxes are great. You don’t want to damage the mating surfaces, or fill it with junk - the point is to get the junk out!

These are the intake passages to each cylinder. Honda suggests replacing this gasket when replacing the intake manifold, but as long as it doesn’t tear, I don’t see any reason it can’t be reused. If you’re outside, now is a good time to put something over the intakes so crud doesn’t fall in.

On the very right, looking from the front, there’s a smaller passage that is probably filled with some carbon. This is the EGR passage from the valve down below, and if it’s really filled with crud you’ll want to clean it out as well - remove the EGR valve (cylinderical thing down further), and brush this passage out. Here, it’s not very restricted at all, so I’m not going to bother with it. If you are cleaning this out, you’ll want to use compressed air to get everything out of it - and definitely close the intake runners up, because it’ll make a mess!

The bottom of the intake manifold matches the top of the engine, as one would hope!

Cleaning the Crud
Now comes the gross part: Cleaning all the crap out. A small flathead screwdriver seems to work very well for opening things up - you can twist it in the circular sections, run it along the straight passages, and scrape the flat sections. Just start going at it.

Depending on how bad things are, you may get some help from filling the passages with carb cleaner and letting it sit for a while - it helps soften the crud, and it’ll come out in clumps on the screwdriver.

For the intake manifold, do the same thing for the holes in the top - they’re not very deep, so it shouldn’t take you much time to break the carbon free. It’ll drop down into the intake runners, and you can wash it out with some carb cleaner. You’ll also want to make sure you’ve cleaned out the hole on the right end - this seems to build up a good amount of restriction. You’re not returning it to factory condition - unless you want to. Just clean out most of the restrictions.

Before you put everything back together, hose it down pretty well with carb cleaner. The engine will probably chew the carbon fine, but there’s no reason to make it try. Clear out the passages, spray off the access panel, and use some paper towels to clean off whatever’s left over. You can see how much of a mess has been left on the bottom here before I wiped it down.

Reassembly is the Reverse of Disassembly!
But just in case you hate that phrase, the first step is to put the intake manifold back on. The studs locate it - so make sure it’s sitting nicely over both studs, and everything else is aligned!

Use. A. Torque. Wrench. They’re cheap, and there’s no reason not to buy one if you’re doing anything in an engine bay. Spec for these 12mm bolts and nuts is around 17 ft*lb, and you’ll want to generally tighten from the inside out. I prefer to hand tighten everything to “just snug,” and then go back with the torque wrench and apply the proper torque.

Don’t forget your hoses and sensors in the back!

Clean the gasket a bit if you’d like, and put the access panel back on. Remember, this is how the gasket sits on the engine - shiny side up.

Access plate goes over the studs, bolts and nuts go on. For these 10mm bolts, you’ll want about 12 ft*lb - much more and you’ll snap them.

Finally, the throttle body goes back on with the 12mm bolts and nuts. Like everything else on this engine, slide it over the studs and secure in place. I really, really like their habit of having studs for everything! There’s a bunch of hoses and connectors that need to re-attach if you’ve removed them, so do so.

The replacement intake snorkel doesn’t have all the same stuff that the old one does - simply swap any pieces over (here, a set of resonators that… resonate and do something important, I suppose).

Snorkel goes in, and secure all the assorted hoses in place.

Now, before you fire it up, find what you forgot. You should be entirely out of bolts and nuts. Then, go through the engine bay with your fingers, poking and prodding all the assorted hoses and lines in the area you’ve worked. There should be a hose for every nipple, and a nipple for every hose - you don’t want unfiltered air getting into the engine, and if you leave things disconnected, that’s exactly what you’ll have.
Crank it up and see what it does!
The battery had been disconnected and it was a bit rough on startup - as is typical, when the ECU is re-learning everything. I made sure there were no codes pending, then took a 20 mile drive at a range of speeds to let the engine learn. I’ll suggest that there’s no harm at all in letting these engines wind up, and I’m guessing it’s been a while since this engine saw north of 5000 RPM - but it pulls quite nicely up there, and was, at least after the work, silky smooth! Let it learn, and check codes - I saw nothing after the drive, so hopefully this problem is done and the van can go back to regular service as a people mover!
Postscript: An Apology
I do recognize that I’ve failed badly by Internet Automotive Standards in this post. I had 1000W of halogen work lights (seriously, 1000W of incandescent - not the LED versions, I use proper lighting) purring away for some of the photos in the engine bay, and I used a standalone camera instead of a cell phone to get the shots.
So, in the form of making sure this is a bit more standard, here are some photos taken with my flip phone. In this first one, you realy can’t see any of the stuff I’m talking about, but down there, kinda, up… well, off to the right, there’s going to be a thing, uh… sort of, like, bit of a doohickey but not really, more of a whatsit, that you’re gonna need to go past to the… anyway, it’ll be in there when you see it!

And, well, you can’t really see it here, but it’s behind the hose, it’s… the…

Seriously. Let’s do better with automotive repair guides on the internet. Video isn’t the solution to everything.
Comments
Comments are handled on my Discourse forum - you'll need to create an account there to post comments.If you've found this post useful, insightful, or informative, why not support me on Ko-fi? And if you'd like to be notified of new posts (I post every two weeks), you can follow my blog via email! Of course, if you like RSS, I support that too.

