
A while back, I posted some comments about how to densely pack PDF pages onto sheets of paper for the purposes of sending them into prisons, where digital communications are limited, and envelopes are mostly unlimited. It was a good start, but as I’ve continued to ship things in, I’ve found a far better tool for the job, and have written myself a few scripts that make the job rather nicer in the deal!

So, this week, I’m talking about the handy little PDF N-up refactoring utility, pdfxup.
N-Up Formatting
The general term for “putting multiple pages per page” seems to be N-up printing - so if you put two pages per sheet, it’s 2-up, four is 4-up, etc. Pretty handy and a useful term to know if you’re playing in this space. I’ve found anything from 2-up to 8-up works pretty well, depending on the content, font size, and target audience.
As the number of people I’m sending material to has increased, I’ve run into the problem that people’s eyes are different. Some people can read quite small text and are happy with it. Some people are far less-good at reading small text, especially with older prescriptions, so it’s helpful to be able to send in larger text. For N-up formatting, this usually involves just putting fewer pages per page, and sending in a few more envelopes - but also, don’t just assume that putting fewer pages on will make things bigger. It really depends on what the bounding dimension is, and… if only there were a tool that would tell you things like “How much smaller you’ve made things.”
Enter pdfxup
Quite a bit of the complicated work (calculating a bounding box and figuring out the scaling) is actually automated in the tool called pdfxup. From the description:
pdfxup creates a PDF document where each page is obtained by combining several pages of a PDF file given as output. The important feature of pdfxup, compared to similar programs, is that it tries to compute the (global) bounding box of the input PDF file, in order to remove the margins and to keep the text only. Instead of having the font size divided by 2 (for the case of 2-up output), in some case you may end up with almost the same font size as in the original document (as is the case for a default ‘article’ document produced by LaTeX).
Installation is easy enough:
sudo apt install texlive-extra-utils
And now you’re ready to slice and dice PDFs!
A basic command line for it would be something like this:
pdfxup --paper letter -x 2 -y 2 -l 0 -o slice-and-dice.pdf input.pdf
The options you’ll need are pretty simple. At least for me, my systems tend to default to the a4 paper size, and I’ve not really fought that, so you’ll want ---paper letter to inform it that you don’t want a4 output. It’s not that it won’t work, it’s that it doesn’t make full use of the paper size, so you waste space. The -x and -y parameters are how many wide and high you want it to pack things. For some things, you’ll want portrait orientation, so -l 0 sets that (“not landscape”), otherwise -l forces landscape orientation. The -o parameter is your output filename, and then you give it the input filename!
When it runs, you’ll see something like this:
$ pdfxup --paper letter -x 2 -y 2 -l 0 -o six_act_2x2.pdf six_act_saga.pdf
-> processing options
-> computing bounding box......
-> producing final file
   final scale: 53.08838%
-> cleaning
The “final scale” number is the important one here, because this tells you how much it has shrunk the content - here, to half size. When you’re comparing different outputs, you’ll want to pay attention to this, because sometimes you can get bonus content without shrinking anything if you’re willing to pack!
Putting Books on Paper
Where packing things tightly starts to get especially fun is when you’ve got source material in “standard paperback book aspect ratio” sort of pages. You can start packing a lot of these on a sheet of paper while keeping things entirely readable!
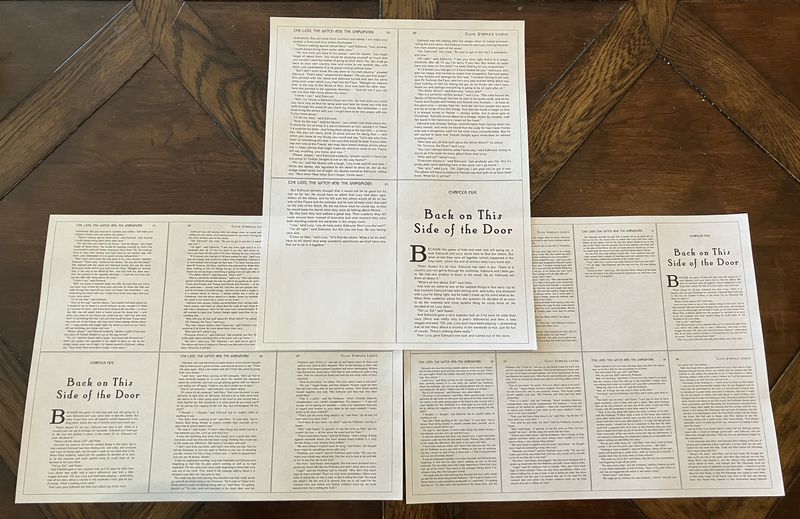
Here, I’m formatting a copy of the first Narnia book. If I go with portrait orientation, 4-up (2x2), I get something quite a substantial fraction of the original size.
final scale: 73.02246%

And it’s quite readable, even with worn out eyes!

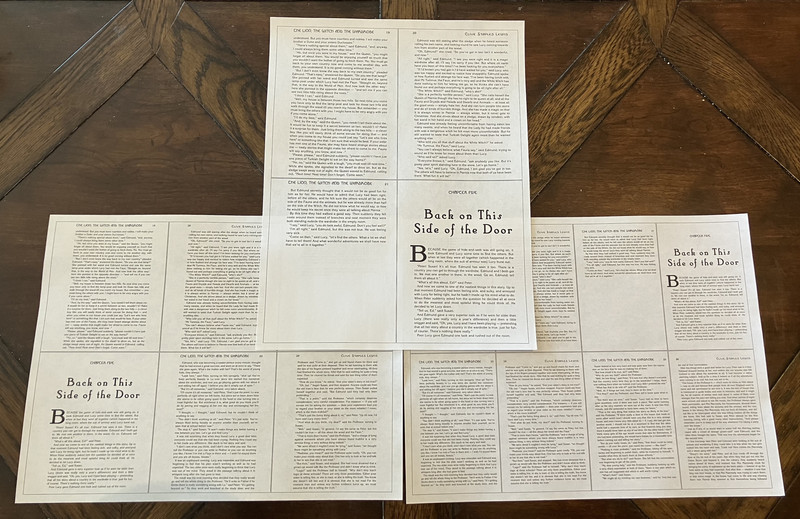
But if I want to cram things in tighter, landscape is the way to go - and it’s worth making sure you’re playing with the limits of what you can do. A standard enough arrangement would be 3x2 - and here, things are smaller, but still workable.
final scale: 55.71747%

But what if I try to put 4 across? As it turns out, the scale is almost the same, for 33% more content per page!
final scale: 51.7334%

It’s small, but it’s entirely readable if you have decent eyes or glasses.

So just be willing to play around with it, and see what you can cram in. It’ll depend to a large extent on what people are willing to tolerate, but at 8-up printing, that’s 16 pages per sheet, and at 17 sheets per envelope on two stamps, that’s a whopping 272 pages per envelope. That is, quite literally, a small book in an envelope! Even at only 4-up printing, you can still fit 136 pages per envelope while keeping things very large.
Scripting It
All of this is nice, but it gets somewhat tedious to deal with when you want to handle a lot of PDFs all at once. So, of course, I’ve written a handy script that will take a directory of PDF files, slice and dice them in a variety of ways, and put them in output directories so I can easily pull and print the proper size. I will suggest printing a copy of each size - different things format out differently, so it’s a good idea to print a page and make sure the font size is readable, but if you want to do large scale PDF N-Up processing, this little script might help you out!
You will need cpdf installed. Drop it somewhere in your path.
#!/bin/bash

mkdir 2x2_p
mkdir 3x2_l
mkdir 4x2_l
mkdir black

for file in *.pdf; do
	prefix="${file%.*}"
	blackfile=${prefix}_black.pdf
	echo $prefix "2x2_p/${prefix}_2x2.pdf"
	cpdf -blacktext -decrypt-force $file -o black/$blackfile
	pdfxup --paper letter -x 2 -y 2 --portrait -o "2x2_p/${prefix}_2x2.pdf" black/$blackfile
	pdfxup --paper letter -x 3 -y 2 --landscape -o "3x2_l/${prefix}_3x2.pdf" black/$blackfile
	pdfxup --paper letter -x 4 -y 2 --landscape -o "4x2_l/${prefix}_4x2.pdf" black/$blackfile
done
I talked in the previous post about making all the font properly black before shrinking it, so it prints properly - and cpdf can also remove some password protection that interferes with pdfxup processing, so I do that as well.
Then, I just slice and dice into a few different formats - 2x2 portrait, 3x2 landscape, and 4x2 landscape. For almost everything out there, one of these will be what you need, though if you run into something particularly weird, you can always add your own lines. I’ve found some stuff that’s about 3:2 aspect ratio, so is better packed 1x2 portrait, but it’s not very common.
Run this, find your stuff, and print!
Random Gotchas
Sanity check the output, of course. One thing pdfxup struggle with is when there’s a full page image for the title, with smaller content spacing later on. You can always just skip the title page - the -p [start]-[end] parameter will do this for you, or you can use Briss as I previously described to crop content down first.
I’ve also run into some PDFs that simply refuse to render properly in some of the PDF engines - pages are randomly blank. My solution to this is Google Chrome. If you load a PDF and go to print it, one of the options is “Print as image” - this creates a very large output PDF, but it seems to solve rendering issues. Handy if you need it.

Some Notes on Printing
Be nice to your audience. If you’re printing things portrait, you’ll want to use “longest side” flip, which is the default two sided printing. If you’re printing landscape, you’ll want to use “shortest side” flipping, so things aren’t inverted on the two sides of the paper. You’ll figure it out quickly enough if you just try a few test prints.
If you’ve got a newer Brother laser printer, they’ve changed around how you handle the “I want you to just keep printing from this toner cartridge, until I replace it!” process. It used to be pressing hidden buttons and some arcane key sequences, and now it’s far easier. Settings -> All Settings -> General Setup -> Replace Toner -> Continue. Do this, and it will whine about being out of toner, while still printing quite a few more pages. When you start seeing some grey streaks, pull the cartridge out, shake it side to side vigorously a few times, put it back in, and you can usually get another 50 or so pages out of it before it quits for good. I get quite a bit of extra life out of the cartridges doing this, and it’s well worth the hassle. I’m glad they changed this around - it’s a lot more reasonable this way. Be aware that this setting resets every time you replace the toner cartridge, and I’ve not found a way to change this mid-print-job. You have to cancel the job to change this setting, which is annoying.
And, of course, printing out envelopes is handy. If you go into your printer setting dialog box in whatever you’re using (I use LibreOffice), you can usually tell it to only feed from the manual feed - so the printer will just sit there and wait for you to stuff a new envelope in the front, instead of having to print things one at a time! There is an art to keeping up with the printer… one which I seem to lack. But you’ll get better with time.
Comments
Comments are handled on my Discourse forum - you'll need to create an account there to post comments.If you've found this post useful, insightful, or informative, why not support me on Ko-fi? And if you'd like to be notified of new posts (I post every two weeks), you can follow my blog via email! Of course, if you like RSS, I support that too.
