

This week (sorry, I’m behind on posting lately…), yet more Ural work, with another focus on the electrical system. There’s no shortage of things to write about repairing on this bike, though at this point I’m largely looping around to a lot of the same maintenance as I keep using a 20 year old Russian motorcycle as a daily driver in 2025.

Battery Replacement
“It’s always something minor. But with a Ural, it’s always something.” This winter, I sorted out that my battery just wasn’t holding up as well as it ought. I don’t have a voltmeter (yet… I plan to install one), but it was becoming apparent that my battery just wasn’t holding a great charge. The starter was slow, and the occasional spot check with a voltmeter indicated that the battery simply wasn’t holding up as it should. As near as I can tell, the alternator is fine, the battery just isn’t. I last replaced the battery a few years ago, and I put a fairly cheap battery in. At the time, I rode this bike more in the summer, I had a defective lighting system that didn’t use very many watts, and I didn’t have any heated gear to stress stuff. So, in goes a new battery.
Urals take a 20HL size battery. The positive terminal is on the right (with the terminals facing you), which is backwards to a lot of motorcycle batteries, but it’s a standard size and you can either order one online, or find one locally. I’m doing very unfriendly things to my battery this year, so I picked up a Duracell AGM at the local Batteries Plus sort of store. It’s not cheap, but it does have a two year warranty, and I’m beating up the battery quite hard this winter.
The battery on a Ural is under the side cover, directly below the seat. Newer Urals have a handy-dandy screw in plate for the seat to mount to. My seat plate is welded, so I can’t go out the top. Not that I need to. Seriously, the batteries aren’t bad. The important step is to pin the kickstart lever down, somehow. Here, I’m using a piece of lumber I had laying around, wedged under the shifter. I’ve used bungee cords too, and a zip tie would work fine. Just pin the lever all the way down, and the rest is straightforward.

Well, mostly. The catch here is that the outside terminal is the positive terminal, and the bike is negative grounded. I’m sure there’s some clever way to get the negative terminal off first, but I’ve certainly not worked it out. Just be careful, or, if needed, wrap your screwdriver with a layer of tape first. You slide the battery sideways until you can get to the positive terminal, and remove the screw. On my bike, I’ve got a whole pile of stuff that attaches to the positive terminal, so keep track of what goes where. The right order to reassemble things, IMO, is “The starter wire on the bottom, and the rest doesn’t really matter.” Once the positive terminal is off, you can pull the battery far enough out to undo the negative terminal. The rest of the process is a matter of wiggling the battery until you figure out the exact set of angles required to make it come out.

You should have a rubber bit of vibration damping material under the battery. If it’s not there, find something similar and add it. I expect it’s there for a very good reason.

It’s hard to really describe the process of getting the battery in and out, beyond “The bottom corner should pretty much brush the top bolt on the back of the starter.” If it’s too low, it hangs up on that. If it’s too high, it won’t clear up top. But if you play around, you’ll get it sorted out and the battery will slide into place without anything resembling excessive force.

Back in, my suggestion is to then zip tie the battery down. I don’t know if there were other hold downs at some point, but a tight set of zip ties does a good job of keeping the battery from wandering around if you’re doing stupid stuff off-road.

Seriously, it shouldn’t take you more than about 15-20 minutes, tops, to do a battery. Don’t let the concept scare you off!
Chasing the Sparklies: Ground Wire Replacement
Of course, after I replaced the battery, the bike picked up an old habit that I haven’t exactly missed: The “Shower of sparks” starting system. Symptoms are simple: When you press the starter button, a shower of sparks (sometimes - not always, of course, or it would be easy to troubleshoot!) comes blasting out from under the seat. It’s really quite disconcerting the first few times it happens. Years ago, it was a loose ground connection, so I suspected something on the ground wire.
That said, it didn’t seem to actually harm anything, so if yours is doing this, fix it, but it’s not a “red tag the vehicle” sort of problem. Or maybe I’m just less startled by this sort of thing than I ought to be. Some years back, someone brought two old German road flares to a campfire to use as lighters. Neither one lit, so we tossed them in the fire and expected them to burn up. As we learned, they don’t just “burn up slowly.” They heat up without drama to a certain point, and then they explode. Imagine a road flare worth of material all going off at once, and you’ve got the picture. The first time was concerning. The second time, somewhat more expected. It was the third time one of these blew off (remember, there were only two…) that we were left scratching our heads. In any case, I apparently am less-fazed than most by things blowing up in the campfire right in front of me, because I was the only one who just sat in my chair while these made life interesting without any warning. By the time anyone had actually reacted, the event was over, so why waste the energy frantically scrambling back away from it?
Right, Urals. Initial investigation revealed that the ground wire had been rubbing on the frame - maybe it wore through insulation?

The insulation where it was rubbing did not look encouraging, so I taped it up with some electrical tape and went on my way without sparks! At least, for a day or two. Then the fireworks came back… so further into the ground system I go.

Further investigation of the ground wire between the chassis and the battery revealed that I should just redo the whole thing. The nut on the frame and the “spike washer” that helps make contact weren’t in good shape. At least in my bike, this is on the right side of the seat where you won’t generally look at it unless you’re specifically looking for it. Undo that (a pair of pliers underneath will help keep the bolt from spinning), and a couple relays and the chassis to battery ground wire falls out.

I knew the wire wasn’t in amazing shape, but once it came out, the number of “broken strands” was quite a bit higher than expected. It’s a connection up in a dark corner that’s hard to inspect on the bike. Could this sort of thing shoot a shower of sparks at a hundred amps of starter draw? Certainly! The easy fix here is just to replace the entire ground wire. Of course, one does not simply walk down to your local parts store and buy a ground wire for a Ural. At least, not as an assembled unit.

For reasons best described as “Because it was what they had close,” I ended up with some 6AWG welding cable with red insulation. The stock wire is 8AWG, but I’ve never been one to starve a ground wire, size-wise. I wanted welding cable, because it’s far more flexible - you can see the massive difference in strand size and count between the two. Welding wire is less likely to break in operation, though it is somewhat more prone to corrosion, with the increased surface area. Given that I’ve got what looks a lot like vibration induced failure in the old wire, I may as well fix that problem. As for 6AWG vs 8AWG? It doesn’t matter, but you won’t make things worse with a larger ground wire. I’m not saying you need the 4/0 neon blue ring rounding system, but… grounding issues are a bloody nightmare to troubleshoot. If you’re dealing with the system, fix it once and for all.

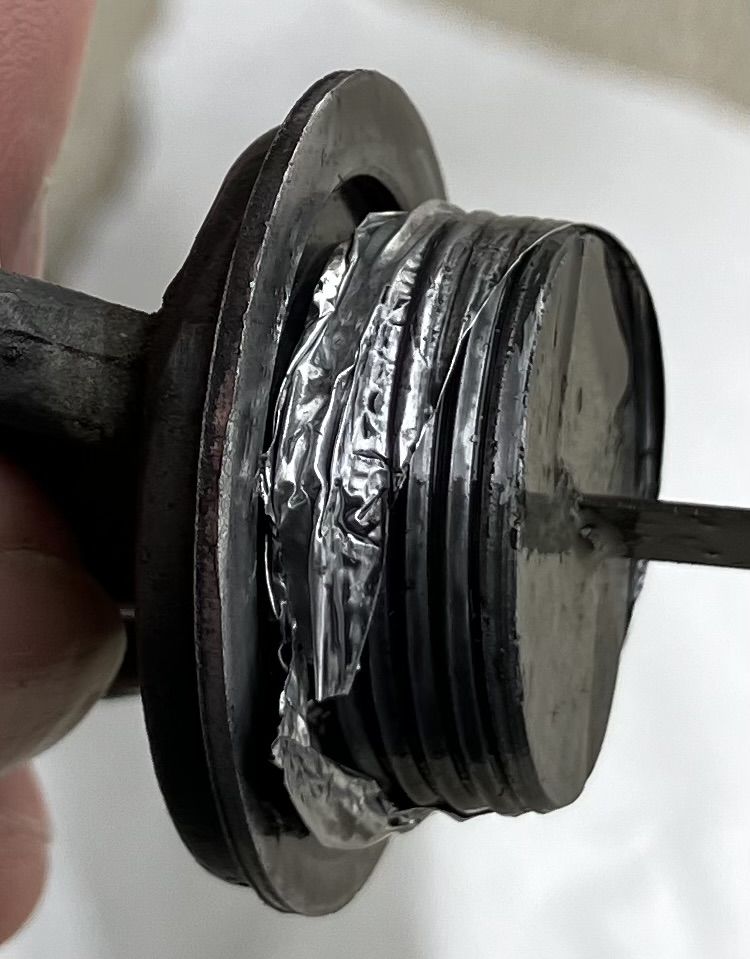
A couple crimps later, and the wire is done. However, it’s also the wrong color throughout. I know myself well enough to know that a red ground wire is going to be a problem at some point in the future (no, the Ural is not positive ground, or this wouldn’t be an issue). Also, they didn’t have anything reasonable in black welding cable at the parts store. But they did have…

Heat shrink! In black! Problem solved! Problem solved! We solved the problem, problem solved! No, I didn’t use my fancy heat gun for this - I just used a Zippo. There’s just something about liquid fueled flame… I try to heat shrink with a flame every now and then, just to keep the skills in tolerable shape. You never know when you’ll need to heat shrink something along the side of the road. I do think it’s easier to heat shrink without burning the heat shrink with a Zippo than with a butane lighter, though. I’m not sure why, but a Zippo just feels like a softer heat.

Clean up the hole where everything grounds. It’s painted everywhere except the top, where mine was somewhat corroded. A bit of sandpaper helps here, as does a Brillo pad, and i scraped until I found bare metal.

Finally, when I put everything back together, I loaded all aspects of the connection with CorrosionX. If you’re not familiar with this stuff, it’s what WD-40 wishes it was - a general purpose corrosion inhibitor, lubricant, and protector of all things metal. A friend of mine (Hi!) suggested this stuff - he used to live on a sailboat, on the ocean. Salt water environments are, to put it mildly, “aggressively corrosive.” He swears by this stuff and used it on everything - and so I’ve started doing the same. The Ural is prone to corrosion all over (if the pictures don’t demonstrate this to you, look more closely), so I’m starting to do much the same. Let it wick into the end of wires. Spray down your connections. Just let the stuff bond to metal and protect it, while allowing electrons free flow through!

Did the new grounding wire fix the sparklies? So far, it seems to have done the job! No more showers of sparks!
Rebuilding the Handlebar Kill Switch
Yet more electrical weirdness on the bike is that my handlebar kill switch has been… erratic. It’s been this way for a while, and largely hasn’t caused problems, but it’s become more annoying in the past few months. Symptoms are simple enough: The bike won’t start despite cranking strongly. Toggle the kill switch off and on again, and the bike lights right up. This switch is inline with the ignition system and it seems that one can get enough of a connection to let the starter relay work, but not enough to actually let the ignition system work properly. I’ve gotten tired of this, so I’ve fixed the problem by cleaning it up. Most switches of this sort are either “trivially rebuildable” (clean them up and go), or are “impossible to rebuild” (some sort of micro switch of molded plastic housing). I’ve not found much in between. This is a Ural. It’s the best of 1940s tech, slightly modernized. This switch is easy to sort out.

Two large screws hold the switch together. Remove them, and the switch comes apart with a slight bit of wiggling.

Inside you’ll find several switch bits and pieces - and two thirds of those are even used! The center section here is a bit of wiring that isn’t used on US-spec bikes - it’s a headlight toggle for European bikes, which apparently don’t (or didn’t?) require the headlight to be on any time the bike was on. US law requires motorcycle headlights to be always on, so this entire mechanism is skipped on the US bike wiring. They just didn’t bother removing the parts from the switch.

Pull the visible screws out and the switch comes apart. There are a bunch of unused contacts in the center section, and the goal of my project - the two wires leading to the run/kill switch. It’s several plastic pieces that simply pull (carefully… it is 20 years old!) apart to reveal the switch contacts.

The contact side has three contacts. Only two are connected to anything, but they’re showing some signs of corrosion (that green-blue stuff is a dead giveaway that this has gotten wet at various points), and it could use cleaning. You can see the arc the contacts trace as the switch moves - I would guess on some motorcycles, this makes a connection to power the ignition circuit, and on others, it grounds out the ignition coil when it’s turned to the “kill” position. I’ll be honest, I’d rather not have ignition coil voltage anywhere near my hands.

The other half is a metallic set of contacts that slide around. It’s not incredibly obvious in the photo, but the top section here is a bit blackened, implying that there’s probably been some arcing in here over the years. Or at least heat. Nothing seems particularly damaged, but I’d rather see a nice shiny set of contacts. The resolution is simple: Clean these up, apply CorrosionX to bond to the metal and protect it, and reassemble the switch. You could probably put some diaelectric grease (“tune-up grease”) in here if you wanted, but the switch gear was dry when I pulled it open, so I’m inclined to leave it mostly that way.

When re-assembling the switch on the bike, you have to make sure that the rear of the switch is in the proper spot. There’s a locating hole on the handlebars, hidden behind the brake lever…

And a peg on the rear housing that goes into this. Do that, and everything will go together properly. Miss that, and the housing either won’t clamp down properly, or will break something. Make sure the peg is seated before you tighten things down!

Rebuilding the Ignition Switch
Of course, the run/kill switch isn’t the only switch that can impact the ignition system. There’s also the “main ignition switch.” This switches several different circuits based on the position. Two are labeled here. There are three positions - the one to the right of the “run” position is the “parking” position, with some of the marker lights lit up. I’ve no idea who uses this position, but it’s a thing. These switches also go bad over time. An easy way to check for “weirdness” is to pull the fusebox cover off and start probing voltages. They should be all fairly similar - if one is a volt or so lower than the rest, it’s time to go prodding your ignition switch deeply. Fortunately, like everything else on an older Ural, they’re really simple!

Step one of working on the ignition switch is to get access to it. Remove the headlight bucket with the two bolts on either side, disconnect a connector (familiar to me from Part 2), and you can see the switch over there on the right. Now is a good time to clean out your headlight bucket. It’s likely to be a dusty mess.

So… here’s my tip on removing the headlight bucket: Mark the alignment before you remove it. I’ve run my fingernails along the edge of the shroud, and it makes for a fairly clear alignment mark. When you put the bucket back in, align it to this, and odds are pretty good your headlight alignment is close! You can also just use the difference between “pummeled by heavy rains” and “not” as an alignment marker, as it turns out. There may be some slight tweaking required, but this solves an awful lot of the headlight alignment problem if you have to open up the headlight bucket.

If you’ve somehow managed to screw up the wiring to your ignition switch, this picture should help you. Orange is at the bottom. Red is towards the center. And along the top edge, from left to right, is yellow, blue, grey. These need to come off if you want to remove the switch, of course. Undo the two exterior screws, and the switch pulls out.

With the switch out, clean things up. The switch is probably filthy after 20 years, which doesn’t improve anything. If you look around the edge, you’ll find three spots of “metal bent in.” These need to be pried out if you want to disassemble the switch, and this may require some effort. I’ve found a small set of standard screwdrivers helps a lot - use a small one to make some room to fit a larger one, and progress until you’ve bent the metal out enough to pull this back plate off. That’s literally all that’s holding the switch together.

Once enough of those are freed up (it turns out, you only have to really free up two of three and the plate comes off), you can see the guts of the switch! The right plate here is the back with the contacts. The left is the contacts that rotate with the key. This routes current around to the various circuits as needed, and I’m not going to bother reverse engineer the details of the connections. You’ve got enough details to do so, if you want.

The contact plate is greased, and shows signs of assorted “crud buildup.” Is this arcing? Is this age? Don’t know. Don’t care! I’m going to clean it up, re-grease it, and see how things work!

With the grease cleaned off, you can still see wear marks and some buildup. I’ve decided to scrape this stuff off (as has been done on the top two terminals), CorrosionX it, and see what happens.
Below the switch gear, the rest of the setup is very simple as well. Two sprung ball bearings ride along the bumps and lock the switch into various positions. These also provide spring pressure for the contacts. Watch out for the springs and ball bearings if you take things this far apart, but it’s not hard to put back together. Just place the dish over the rotor and gravity holds everything together.

Clean it, CorrosionX it, add some grease, reassemble, and go on your way!
Does it make a difference? It might be some butt-dyno effects, but it certainly seems to! After redoing the ignition switch, the handlebar switch, and the ground wire, the bike feels like it runs a good bit better! Lacking voltage to the ignition system is certainly plausible as a cause for weird running…
Ural Life Carries On!
Again, this is just life with a 20 year old Ural. If you like the concept of a Ural, and this series of posts horrifies you, get a newer one. They’re… differently weird, at least. And maybe skip the first gen fuel injection system. I’ve not heard much good about them. Either get a late carbureted era one (2012-2013), or get a second gen EFI model. But I don’t mind it, it keeps me busy, and it’s certainly made life interesting enough lately!
Comments
Comments are handled on my Discourse forum - you'll need to create an account there to post comments.If you've found this post useful, insightful, or informative, why not support me on Ko-fi? And if you'd like to be notified of new posts (I post every two weeks), you can follow my blog via email! Of course, if you like RSS, I support that too.


