

Yet more notes on the art of Uraling - this time with a bit of a focus on winter riding improvements. Plus other general improvements over the time. Yes, this is life with an old Ural. Yes, I expected it. No, it’s not terribly annoying. Also, if it looks like the general quality of lighting in the posts is declining from “Nice and sunny outside” to “I’m working in a dark, poorly lit garage” - that’s only because it’s entirely accurate. Maintenance on an older daily driven Ural doesn’t stop when it gets cold. It just involves more flashlights.

Attaching Bar End Weights to a Ural
Over the years, I’ve been a fan of adding bar end weights to motorcycles. The primary reason I add them is to help damp bar vibrations, but they can be helpful for protecting the bars should a bike tip over too. This is less than likely on a Ural (the only way they’ll go over is hitting a corner too fast, and bar end weights or sliders won’t help you here). But, should you want to add bar end weights to an older Ural, it’s not too bad. It just doesn’t really seem to make the slightest bit of difference. I put 10oz bar end weights on (quite massive), and I can’t tell they’re there. But they are handy to have for mounting some other stuff, and I’m somewhat proud of the hack involved.
Typically, a bar end weight will look like this - the weight, a bolt through the center, a nut on the end, and some rubber that will smoosh out into the bar and hold things in place. This works well for modern bikes.

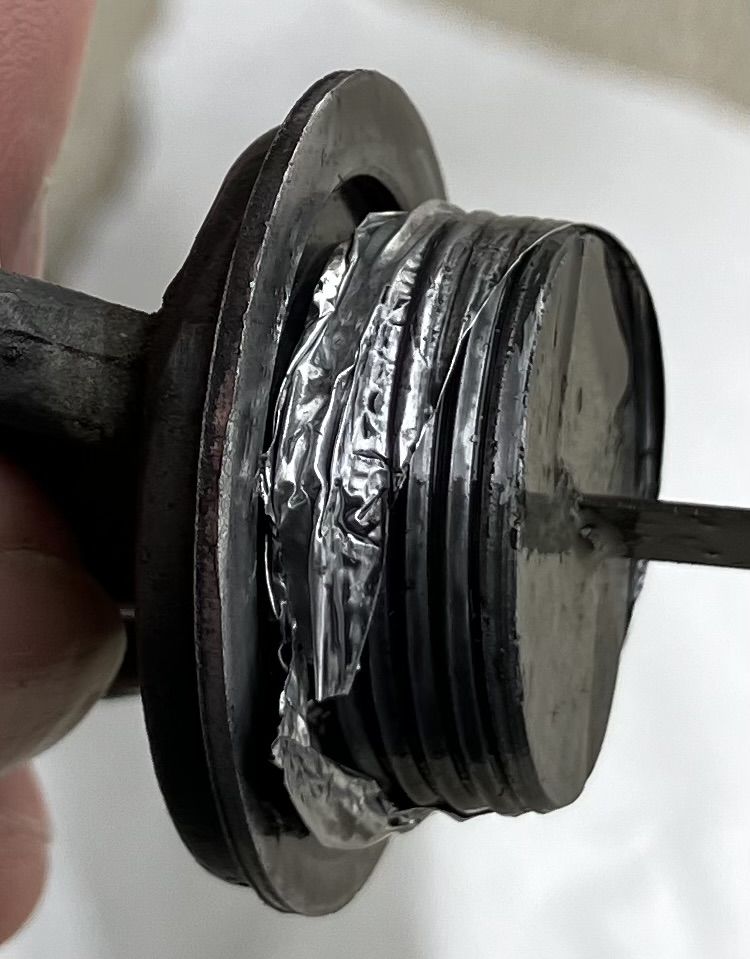
It does not work well on older Urals. The bar diameter is weird, the metal is thick, and no matter what you do, this isn’t going to fit in the bar. What Would Ivan do? Well, a chunk of fuel line is smaller, rubber, and smooshy. I happened to have some laying around from redoing the fuel system somewhat (the crossover between tank halves didn’t seem to be working so I replaced the line and it improved things). Hm…

The fancy modifications: Flip the hat over the other way, add the fuel line. You get the same effect of smooshing rubber out, and it fits in the bar. Adjust the fuel line length as needed to make this all work.

I did have to trim the rubber end of my grips to open up a hole for the bar end weights, but once installed they’ll keep everything out of the bars. Be careful on the throttle side - you don’t want the bar end weight to bind against the throttle. But crank the bolt down, and you’ve got bar end weights! These are also very handy for winter riding, if you want to improve the state of things slightly with regards to your hands.

Barkbuster Blizzard Handguards
I hate to say I’m getting older, but I am. This happens with time, apparently. I’ve been riding for quite a few winters with nothing but insulated gloves, and with the wisdom of age, I’ve determined that this is getting stupid. When your fingers hurt from riding in the cold, this is totally fine. It’s when your fingers stop hurting in the cold that it’s time to worry. I’ve added heated gloves this winter, and they help quite a bit - but also, I’ve been curious about the proper winter-grade hand guards that fully wrap around your hand. I’ve heard really good things about them. Normal handguards are better than pure wind on your hands in the winter, but they don’t really do as much as I’d hoped over the years. I’ve ridden with them, they’re fine, but the wind really does whip right around them. How about something a bit more… deliberate?
I did consider Hippo Hands, too. These are a big insulated bag you wrap around your bars. The problem with them is that unless you have other hand guards, they tend to ride on your controls at speed, and I’ve had the displeasure of being in a tight formation with a guy whose brake lights were on constantly because of these - at speeds sufficient to make me wish I could tell if he was about to slow aggressively. Also, I spend more time than I’d prefer clearing the freezing fog from my visor, and the Hippo Hands don’t seem well suited to “removing your hands to clear the ice.” I know people like them, and I’m sure they do what they claim, they’re just not my first choice for hand protection.
On the other hand, “Built for blizzard conditions,” and still allowing easy hand access in and out? I’m not sure how many people ride in actual blizzards, but I’m certainly one of them. One set of Barkbusters Blizzards later, and I’ve got a new thing to play with!

The kit comes with two fairly massive handguards, some velcro triangles that help seal the inner corners, and a pile of hardware used to install them. They don’t really come with “Installation Directions.” They come with “Installation Suggestions, apply to your bike as seems appropriate, or do something else that works.”

They install just like anything else on a bar end - a bolt that expands something. The metal expandy-things are different from the rubber I used on my bar end weights but work the same. My only real concern is that “wedge metal expanded” sort of installations tend to be difficult to remove - and these are certainly not year round items, in my opinion. First, you don’t need them in the summer. Second, this sort of nylon tends to degrade under heavy UV - so they’re a seasonal winter item.

If you already have bar end weights, though, they have some alternate suggestions. Really, these are very much universal install hand guards. If you can’t figure out how to install them with the rather extensive collection of provided hardware, a quick run to your local hardware store will set you up.

I decided to install mine with my existing bar end weights, which another 6-7 years later, are holding up just fine.

The only problem is that the bolts aren’t quite long enough for the (rather long) bar end weights as well as the spacer cap and the bit of fuel line. Because it’s dreadful outside, I decided to install them without the spacer - which works fine. I did, slightly later, go to the hardware store for a longer bolt so I could install the spacer. This is worth doing - they don’t feel like they’re going to pull out nearly as easily with the full length buried in the bar.

Ensure the aluminum rod is installed to keep the grips from rotating, use the proper end piece, and just clamp everything down. It really is that simple!

The inboard end is nothing complex - wrap a strap around the bar and clamp down. Make sure you wrap the strap around the bar and not your wiring harness, hydraulic lines, etc. If you want better wind protection, the velcro triangles go inboard of the main guards. With how my windshield deflects air, these seemed like a good idea to install - so I did. They just velco in and close up the gap!

Ensure nothing binds with the throttle, ensure your controls are free, and that’s it. It’s honestly the easiest install of anything I’ve ever done on this bike. I now have deep pocket hand guards that should keep the wind very nicely off my hands and give me free access to everything I need.

Presto! Installed! I decided to be stupid and test them out with a 20 minute ride in the freezing fog - with my summer riding gloves! My summer gloves are nice, but they are not suited to 28F weather with the fog freezing to everything - and despite that, my hands were “mildly cold” at the end. Nothing hazardous, nothing dangerous. I’m sold - these things do what they say, 100%. If you’re riding year round and don’t have a good solution to keep your hands warm, I can say very good things about the BarkBuster Blizzards! Just… if you’re not on a Ural, there’s probably no good reason to be out in these sort of conditions.
I wasn’t running the sidecar headlight on my test ride - and this isn’t water on the lens. This is ice. This is also a reason I’m running halogen bulbs (I didn’t have the sidecar light running during the ride, because I kind of wanted this shot). LEDs simply don’t put out enough heat to keep the ice melted from lenses. I have no idea how cars with LED headlights manage this, but on the Ural? Halogens solve the problem neatly.

After riding with them for a while, they do exactly what they claim to - they create a nice still pocket of air around your hands. This keeps the wind from slurping the heat out of your hands. It helps with heated gloves, but also helps prevent needing heated gloves. Beyond that, they’re great in the rain. I can ride for a while through a steady rain and my gloves aren’t soaked - which is a common enough problem, because gloves do not dry when out and about! I’m absolutely sold on these, and they’ll be rotating on and off every winter from here forward. If you’re on the fence, don’t be. They are absolutely worth the money!
Turn Signal Flasher Replacement
Another interesting problem this winter as temperatures dropped was that my turn signals simply stopped working. They worked at the start of a ride. They did not work, in the slightest, at the end of the ride. Unfortunately, when riding in the winter, especially in heavy fog, these things are really “not optional.” There are three points that can cause trouble with the turn signals - the fuse, the handlebar control, and the flasher module. Troubleshooting is pretty simple, though - because it’s almost always the flasher module. Jumper the connectors on it, and if your turn signals light up on both sides (not flashing, just solid), it’s the flasher module.
The flasher module is really easy to find. Turn the handlebars left. Look for the cylindrical thing with terminals facing you. Congratulations, you’ve found the turn signal flasher module!

How do you remove the thing? It’s not screwed in or anything. This module is held in with some bent metal tabs - you can see one below it, at about a 45 degree angle. Unbend them so they’re straight out - one on top, one below. That should free it up enough you can pull it free and unscrew the nuts holding the terminals on.

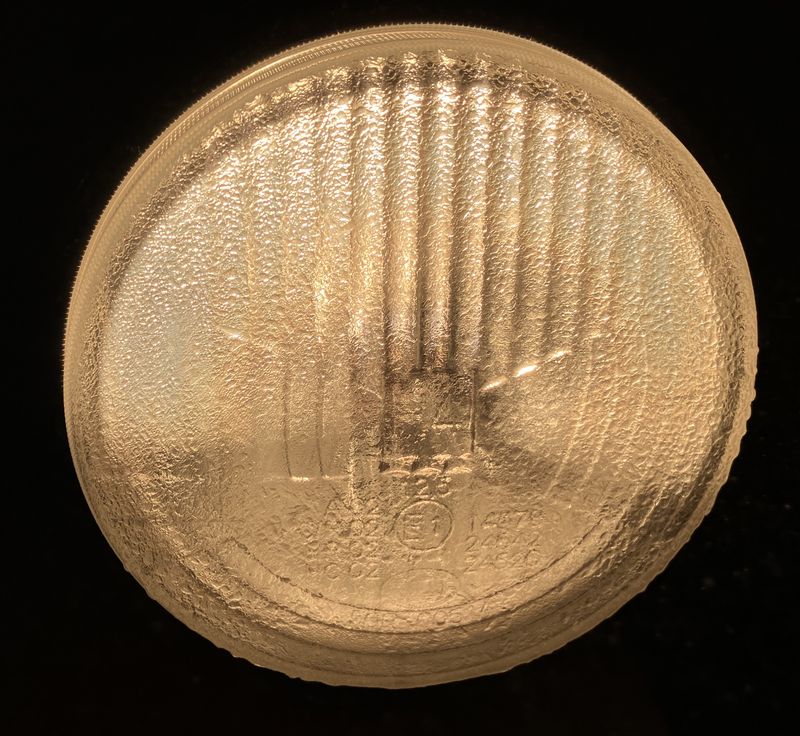
Removed, it should look about like this. Two rubber bushings with metal inserts, probably age-cracked (the rubber here is most of 20 years old), and two terminals. This is the flasher module! If you’re bored, and want to pull the thing apart to see if you can fix it, it’s assembled with nothing but the metal being bent around the mounting plate on the end. A small set of channel lock pliers will do a fine job of opening this up to reveal the guts.

Mine, at least, looks something like this. There’s an electromagnet, some contacts, what looks like a coil of high resistance wire not connected to anything, a hunk of wire that probably gets shorter when hot, to pull things open. I’m honestly not sure how this sort of thing works. I tried soldering the loose spring of wire to the plate it looked like it should go to, and it did not improve the operation of the flasher. If anyone wants this to play with, let me know - I just want a good writeup of the proper function and repair!

The replacement is any bog standard two pin flasher module. Your local parts store will have one of these somewhere. Check the “random parts aisle” first - otherwise they should have something in back. But this is really a very standard part.

How do you verify that the flasher is bad? If you’ve removed the old one, the easiest option is to just make temporary connection with the new flasher. Throw the turn signal switch, use your hand to make contact with the terminals, and turn the ignition on. If you get flashing, you’re 100% confident by now that the old flasher has gone bad. Time to replace! The only problem is that the new flashers use spade connectors and the old one uses ring connectors. Oh well. You’ve got wire strippers and wire crimpers, right? If you own a Ural, you’d better!

The old crimped connection is… a thing? I’m mostly disturbed by this connection. Either it’s overheated, or it’s just blobby. Neither is okay.

There, I fixed it! New spade terminal connectors that interface with the new flasher module. Cut, strip, crimp. It’s nothing terribly exotic, though it’s annoying to do with the short wire lengths available in the headlight basket.

Next step, apply flasher. Red wires to go the input (“X” on this one), grey wire goes to the output (“L” for Load). At this point, test the system - and you should have a working set of turn signals again! If not, well… time to dig in deeper, with a voltmeter, because something far deeper in isn’t right.

You might be tempted to stuff the new module roughly in the place of the old one, in the direction the wires prefer. This would be silly! As a friend pointed out, despite my general lack of rain out here, any moisture will simply lay on the plate, weep into the flasher, and eventually short things out or freeze and render the module dead again.

Far wiser to make sure the module is upright - so water won’t get in. Or, at least, can drain out. There’s no good reason to zip tie things here - just stuff it in place and make sure it won’t go anywhere.

Notes on Ice Fog
This winter, I’ve had the displeasure of riding in about three weeks of heavy, freezing inversion. It is best described as “ice fog,” and acts accordingly. The roads haven’t been too bad in these conditions, though there can be patches of glaze ice to watch out for. The main problem with riding in these conditions is that the ice sticks to everything. I don’t have a heated visor yet - I only have a pinlock style insert. This means I have to wipe the ice off my visor regularly, and over time, it will freeze solid enough I have to stop, take off a glove, and melt the ice before I go on my way. A heated visor would be useful, and I do have a retrofit kit for one, but it’s a lot of extra wiring I’m not sure I want to use unless I really have to.
The weirder problem is that I’m fairly certain I was dealing with some pretty serious carburetor ice. I can’t prove it for sure, but it acted a lot like carburetor ice. When riding in “somewhat above freezing or right around freezing, very humid” conditions, the bike would start and warm up fine, ride fine, but progressively start getting “weirder” as the ride went on. It would be fine at cruise power, but around idle, coming off a stoplight, it would just… miss. Badly. And not the usual winter lean miss, those backfire through the intake with a distinctive “pop” or “whoof.” It would just miss. This got worse over time while riding, until I got to my destination - at which point the exhaust smelled quite excessively rich, consistent with what one gets out of icing. After sitting for a bit, everything was totally happy again until a while into the ride home.
Motorcycle carburetor ice is a thing, and there are even some bikes that come with carburetor heaters that thread into the carburetor (they’re electrical, not exhaust driven like on airplanes). Including some bikes with very similar carburetors to mine… to the point that all I have to do is tap some existing holes to mount them. so I might have to play around with this at some point!
I Own a Motor-Cycle
If it feels, after this endless series of posts, that I’m trying to run around on mid-1940s technology? You’re not wrong. I genuinely feel like I’m living a mid-20th-century motoring life, in the 21st century. However, it keeps me busy on the weekends, and that’s good for keeping me sane. At some point, I might even attempt to daily drive the Willys!
Comments
Comments are handled on my Discourse forum - you'll need to create an account there to post comments.If you've found this post useful, insightful, or informative, why not support me on Ko-fi? And if you'd like to be notified of new posts (I post every two weeks), you can follow my blog via email! Of course, if you like RSS, I support that too.
