
You’ve been wondering, this whole series of posts, how a 2005 Ural manages sorting out ignition timing with a hall effect sensor. I know it! And in this post, you’ll learn exactly how that works! But, first, a few other things.

Dipstick Blowout
Literally the day after replacing my headlight, the sidecar marker headlight decided it wanted attention too and burned out. Fiiiine. Light the bike up to go grab a new bulb, and… well that’s not a normal noise. My dipstick was rattling around rather freely in the threaded hole in the crankcase, and that’s not supposed to happen. Some quick investigation revealed that I could just pull the dipstick out without turning it - it was no longer threaded in. There was plenty of “finely ground metal suspended in oil” around the threads too.
My primary concern was that the crankcase threads had been stripped out - they have some pretty good flat spots, but it seems the hole was just somewhat overbored for the threads during production. You can see some damage to the threads on the right too - but it’s not enough to cause the problem.

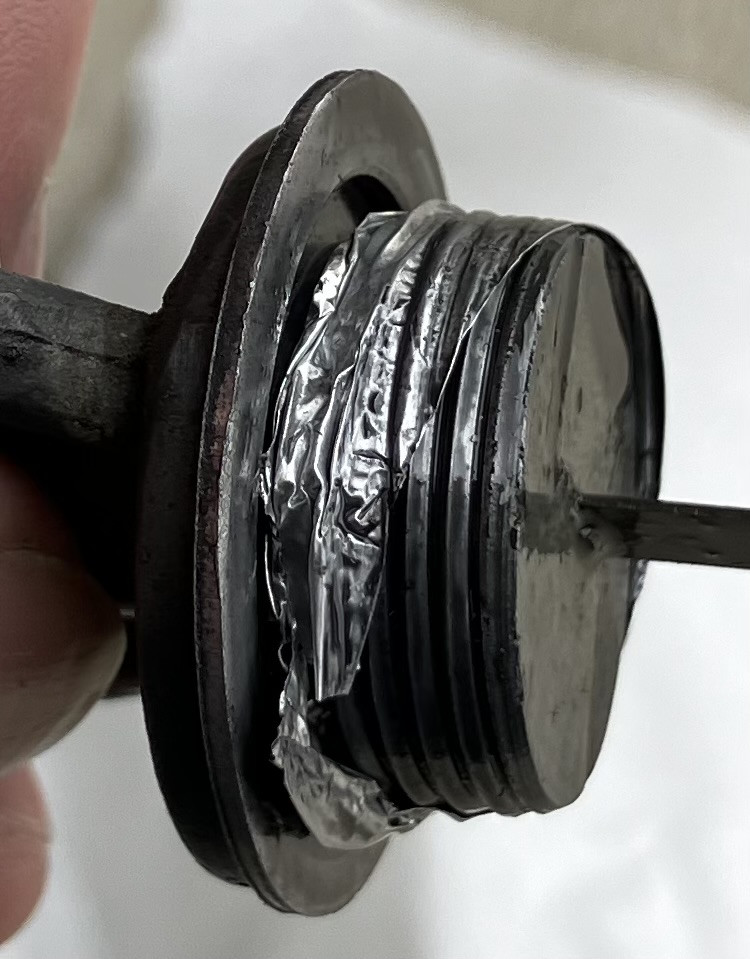
The dipstick side of the threads, though, looked… not quite right. Rather stripped, really.

I got a replacement dipstick, and here’s the difference between what my dipstick (top) looked like, and what it should look like (bottom). There’s a rather substantial difference in the threads between the two. But… how do you fix this while waiting for a new dipstick? Even though the concept of “a motorcycle as year round transportation” is foreign to Americans, I’m one of the few (the insane?) who genuinely does this. Waiting for a dipstick is a possible solution, and if it were a recreational bike only, fine, but… it’s my daily driver. How do you fix this well enough to keep riding?

There’s an important question all Ural owners should know: WWID? What Would Ivan Do? The general principle here is, “Don’t overthink it too badly. This is not a bit of high precision modern German engineering, it’s a Russian military motorcycle built with a lot of 1940s tolerances.” And, also, “Problem? Hit with rock and drink vodka until is no problem.” The threads weren’t making connection with the crankcase anymore - but that leaves no shortage of room for something else to fit in there and help them make contact! I tried a few things, not wanting to fill my crankcase with random crap, and settled on 3-4 layers of aluminum foil wrapped around the threads. Try to keep it mostly around the threads so it doesn’t drop chunks in the crankcase, but this fix works, and you can tighten down the dipstick well enough to get back riding. I’ll suggest a strip or two of tin foil folded up in your tool roll, should you be riding Urals.

But also, I was on my way to a parts store to get a bulb - and after poking around the spare parts section, I discovered that “generic plugs” are a thing. They just didn’t have any in the thread pattern I needed for the Ural oil fill port - M24x2.00. So I asked at the counter, and after a few minutes the guy came back with a plastic version of the same concept (that was rather cheaper, too). It worked perfectly, and sealed the oil fill hole up quite nicely.

Even with the new dipstick, I think I’m just going to run the plastic plug for a while. The dipsticks are fine in the back of the sidecar with my other tools, and it’s actually quite a bit easier to check oil levels this way. When running, the dipstick gets far too hot to handle and remove with fingers, but this way I can actually check the oil when the engine is hot! There’s an O-ring under the plug that helps seal things, and I understand that an O-ring helps keep tension on the dipstick threads too. The plastic dipsticks won’t have a problem with this, but if you’ve got a pot metal dipstick, throw an O-ring in there to hopefully prevent this problem from occurring.
Clutch Cable Replacement
If you need to replace a clutch cable on a Ural, it’s going to be one of the easiest things you’ve done! It’s literally a disconnect, replace, reconnect sort of operation - but that’s not terribly interesting, so… I’m replacing my clutch cable mostly as a preventative sort of thing on a 20 year old bike. The old cable has been starting to stretch more than I particularly like, and the new cables are rather substantially improved, so… may as well. This falls into the category of, “Yes, I can and have ridden the bike without a working clutch, but there’s no good reason to, and I owe the bike parts anyway.”
Signs of your clutch cable stretching: You feel like you’re constantly fiddling with the adjuster at the clutch cable to keep the bike from dragging the clutch at stoplights. I feel like I’ve been arguing with this for a while now, and despite several adjustments, it was becoming very hard to keep the cable properly tight. You want about 1/4” or so of looseness at the end of the clutch lever (maybe a bit more, but not by much), or the clutch won’t fully disengage and you’ll drag the clutch plates at lights. It’s really hard on the (dry) clutch, and it tends to lead to some nasty behaviors when the plates overheat. So take care of your cable adjustments.
The adjuster is separate from the cable - so the lock nut and the threaded thing stay with the bike when you replace the cable.

There are three adjusters on the clutch cable: The one up at the handlebars, the one where the cable end mounts to the holder, and at the actual clutch lever (trace the cable, these are all incredibly obvious). Loosen them up until you have enough slack to remove the adjuster from the bar end and slide the cable out. There’s a slit in the side of all the adjuster parts, so the cable can slide right out. Get it about 90 degrees off the lever, and it comes out of the lever too!

The new cable’s end was rather smaller in diameter than the old cable’s end, and I’m not about to swap cables between sheaths. How to fix, how to fix…

Tin foil! Wrap until it fits tightly, cram it in, and you’re good! When you put the new assembly together, set it up as tight as you can - the cable will stretch a bit in the first few weeks of operation. Set the handlebar adjuster fully in, adjust slack at the far end of the cable, and prepare to mess with it at stoplights every now and then until things stop getting longer. Once it’s done that, take up the slack at the far end again so you can have as much adjustment at the bar end as possible. Then keep the old cable in the bike, just in case.

Valve Cover Washers
The older Urals with a single center acorn nut for securing the valve covers should have a washer under the acorn nut - but they tend to go missing with time and oil changes, largely because a lot of people (like I used to be…) don’t know they’re there. Symptoms include “a persistent oil weep from the valve covers you can’t seem to solve,” and, of course, “no washer under the acorn nut.” If you find yourself marking parking spots on occasion (just a drip here and there), check for a washer.

Any sort of zinc plated M8 washer will work - they’re not anything special. The zinc should prevent them from reacting with the aluminum - they’re compatible as far as metals go. Tighten it down, and hopefully your oil weep stops!

Cleaning Your Steering Damper
Another oddball bit of maintenance that’s useful on older Urals (or probably anything older BMW based) is cleaning and re-roughing the steering damper. Sidecar rigs are very prone to headshake at certain speeds - the steering will, if disturbed, oscillate back and forth quite energetically (and extracting energy from the forward velocity to increase in amplitude). Left unchecked, this ends up as a “tank slapper” - which is the sort of thing you want to avoid entirely on motorcycles. Front tire pressure matters a lot - if you’re noticing more than the usual amount of oscillation, air up your front tire, because it’s low. But, there’s also a friction damper on the older bikes that helps keep this under control. Newer Urals use a hydraulic damper of some variety or another, but I don’t have anything nearly so fancy.
The triangular handle is not mere decoration! This controls the tension on the damper assembly, and it’s handy to be able to adjust it while riding. Rough roads or off-road conditions benefit from more damping than smooth roads. I was running into problems with my damping being impossible to set - if I clamped it down tight enough to keep the oscillation under control, the bike was very hard to turn (relative to how it should be). Someone on a Ural forum mentioned that this damper does need the occasional cleaning and sanding, so, in I went! And, yes, it made a substantial difference once I put it back together.

Removal is simple. Turn the triangular handle counterclockwise, and go catch the outside bracket. I’ve got things somewhat loose here, but this lower pear-shaped piece has a threaded insert in the center and tightens up on some friction material attached to the curved support. Unbolt that, and be careful, because if you’ve got a Type V ignition with the electronics hanging out front, that’s on the same bolt and will happily fall free if you don’t catch it.

As everything came off, a bunch of brake-dust sort of material came out, and the wear surfaces are obviously dirty. This is exposed to all sorts of dirt, water, road grime, etc - so over 20 years of riding it gets dirty. The center bracket has friction material riveted to both sides. The bottom of the triple tree has a smooth surface that rides against it, and everything is squeezed by the lower threaded part - which is very dirty here.

One of the major problems with this system is that it’s prone to glazing - and you can see a perfect example of that here. Friction materials (brake pads, clutch lining, etc) tend to work best with continual motion in one direction. For a steering damper, what it actually gets is “a ton of tiny movements, with occasional movement one way or another and then back to the center position.” Do this long enough, things glaze over and stop being grippy. Throw in some buildup of pad material in certain spots on the metal, and it’s entirely possible to end up with something that can’t be adjusted into sanity. Time to clean it!

Cleaning everything out is really simple. Just clean it off with brake cleaner, and apply some sandpaper. You want to remove any glazing without taking too much material off. Clean and sand the metal friction surfaces, clean and sand the friction material, reassemble. It’s quick and easy, and a good “I have 20 minutes and want to do something on the bike…” sort of project. It absolutely made a difference in how the bike behaves as far as letting me dial in the damping. Now I can have reduced headshake and can still turn the bike!
Replacing Russian Shocks with Sachs Shocks
Yet another project: Replacing my suspension with something faintly newer. The suspension on the 2005 Ural is the old Russian suspension and it is, at best, “present and accounted for.” It’s not very good as suspension (it has a lot in common with solid mounts), and it creaks and grumbles constantly (urnkURNK!). Mine is starting to show some alarming amounts of rust in the center section, and I’ve been looking at replacing it for a while - but I also didn’t want to spend the $1500+ that a “good” newer set was going to run. Fortunately, someone else on the Ural forum did just that on their 2020, and they were getting rid of their stock suspension at a very reasonable cost!
Shiny! Black! Silent!

The suspension swap is largely “bolt off, bolt on.” But you also need some new bolts and washers to adapt things - you aren’t reusing many of the old parts. You’ll need, at a minimum, two reducer bushings, six 15mm washers as additional spacers, and 5x “DIN 960 M10x45x1.25” grade 8.8 bolts and nylon locknuts. If you can’t find those exactly, 50mm long bolts work just fine. However, i don’t think the “partially threaded” aspect is optional - you want at least one shoulder to fit firmly through everything to help transfer the load without it banging on threads.

Put the bike on the centerstand (rolling the rear wheel up on a 2x4 first makes this vastly easier than coming straight off the ground), and unbolt the rear suspension. The left is easy, the right takes a little more work as there’s more in the way, but they should both come straight off. You want to take both off, as the new shocks are slightly longer and it’s easier to do them as pairs. One bolt is 12mm, one bolt is 14mm. You’ll need both washers from the top - so separate them from the rubber bushing if they don’t come free by themselves.

And off they come. Go ahead and thread the existing lower bolt through the bottom of the shock, since you’re replacing that anyway. One of the two sides is threaded.

The upper shock mount point is a 15mm stud welded onto the frame, threaded on the inside.

The bottom mount is a 10mm hole through some variety of bushing. I’m sure you could replace these bushings if you really wanted to, but I see no reason to bother with anything like that on a Ural, especially an older one.

Since the new shocks have a metal core where they mount, it’s worth greasing the interaction point. It won’t hurt anything, and it should help keep things moving a bit more smoothly (the shocks will rotate slightly throughout the range of motion).

Of course, were you to just put the shock on, you’d notice a major problem - it’s far narrower than the old one, and will side around without something to help solve this problem.

What you need are those 15mm washers (though 16mm washers will work just fine too, if you can’t find 15mm locally). One goes on each side of the shock - so you have two 15mm washers on the inside, and one 15mm washer plus the existing (smaller hole) washer on the outside. Line it up like this and everything should tighten down smoothly without free play.

Bolt the bottom up and you’re done! Again, it’s worth greasing the bolt as you put it in. The inside shock is a bit harder to get free, as you don’t have room to swing it as far, but there’s no need to remove the final drive. There’s enough slack that you can work the top free and pull the inner shock without too many heroics, but it’s a bit more fiddling than the outside one.

The front is similar, though you need the “distance bushings” to adapt things. You can see the rust on one of my front shocks here - this was starting to worry me, which is another reason I wanted to swap them out.

The “distance bushing” is a 15mm to 10mm adapter. Get someone to build you some if you can’t find them - though the precision on these is far from amazing. One of mine slid right in, the other one took a hammer to persuade into place. A handy rock would also work, this being a Ural. Grease them.

Just bolt the new suspension on with the new hardware at the bottom, and you’re good! Again grease the hardware up before you assemble it so things can rotate more easily if needed, and since nylon lock nuts are being used you don’t need all the torque on the connections either. They shouldn’t be sloppy loose, but neither do they need to be entirely cranked down. Let things move relative to each other a bit in operation and tighten them some if you keep hearing clunking.
The sidecar shock is much the same as the rears, though it can be a bit tricky to line everything up - the longer shock is slightly longer than the gap between the mount and the sidecar wheel arm. You could remove the rubber bump stop, or you could just use a large screwdriver and pry the shock up slightly to line everything up.

The results? Newer suspension! I’m not going to claim it’s a vast, mind blowing improvement over the stock Russian shocks, but it’s a very noticeable improvement in daily riding . The new ones compress more easily, which softens some of the blows of rough pavement, and the biggest difference is going over rough patches or train tracks - the bike no longer feels chaotic over them, but will stay more planted. I understand this variety is prone to “packing in” on sustained rough roads, but this isn’t a problem I’ve run into in my mostly street riding, so there’s no point in the extra cost to solve a problem I don’t have. For hard off road use, though, most people seem to prefer the more adjustable options on the market. I’m quite happy with the changes for street riding and light off road use, though - this really does make a major difference in how well behaved the bike is on less-ideal pavement.
Timing Interrupter Checks
Again with the “If you have a newer Ural, this doesn’t matter…” sort of things. But on my 2005, it absolutely does, and I am anxiously waiting for someone to sell me a one piece timing interrupter. There’s a “timing chest” in the front of the engine that contains some variety of equipment for ignition timing. Over the years, this has included points, as well as quite a few iterations of electronic ignition. I happen to have a Type V ignition system, which is identical to the Type IV system, except that my microprocessor is hanging out in a “puck” to the front of the timing case - not in there. They got too hot in there and were very unhappy over time.
There are two flathead screws holding the timing chest cover on - one on each side. Unfortunately, these are annoying to get at, because there isn’t a lot of room in front of them to work. You might be able to get a little stubby screwdriver in there, or…

A ratcheting right angle drive screwdriver works perfectly! This is an incredibly handy little gizmo for working on the front of a Ural. Not only is it ratcheting, it has a knifty knurled knob on the back to allow you to easily spin things tight or loose. Harbor Freight has these, though I’m sure you can find a higher quality version somewhere.

With the cover off, you should see something like this. At the top is the ignition coil. It’s a dual fire sort of coil, firing both spark plugs at the same time - so a waste spark system. I’m actually in here to replace my coil, because I’ve been dealing with some heat soak running issues. The bike is fine, cold - and runs fine, for hours, if I’m moving. But if I stop for an hour or two, especially without wind, it runs “weird” after restarting. It’ll pop and fart a bit at idle more than it should, and there’s an odd snarl or growl in the engine note when running at speed - along with a bit less power. Since this only seems to happen after the bike has heat soaked after a shutdown, the coil is a good first bet to replace. They don’t like being overheated, and it’s common enough for a coil to only be erratic when hot. I’ve overheated the bike a few times this summer when stuck in stop and go traffic (the right answer is to either suffer the interstate, or to go pull over at a pub and let things cool for a while), so it’s decent odds that something under here is cooked. The coil is the easier one to replace, in that I have a spare. However, there’s more in here to poke at!
Below the coil is the hall sensor plate - and this is how you set static timing on the engine. If you look on the right side, there’s a scratch mark that extends to the housing, and this marks the timing as set. You shouldn’t ever have to adjust this unless you do something like replace the sensor. If you want to remove it, undo the connector and pull a few screws.

The back of the plate contains a hall effect sensor that the timing interrupter spins in. It’s a bit hard to see with the lighting, but the hall sensor is at the top-left, with a fixed magnet towards the center hole of the plate. How does this work, exactly?

Funny you ask, because I found a PDF that explains it! When there is no soft-iron vane in the way, the magnetic flux flows through the hall effect sensor. When the metal vane is in the way, the flux is short circuited (odd term, but… describes the process well enough), and the sensor sees no flux. Now you know!
In practice, on my Ural, this interruption is handled by a thing called the “interrupter” - presumably because it interrupts the magnetic flux. Or, more likely, because this is the handwaving translation of a Russian term that means something a lot more meaningful. This spins on an extension of the camshaft and is used by the ignition system to sort out the timing. This isn’t a great system, but it’s what I have. An important check while you’re in here is to ensure that the two piece interrupter (if you have one, which I do) isn’t loose. The cup can come free from the center shaft in varying degrees and rotate relative to the shaft. If this happens, your timing has gone random, and nothing good comes of that. Mine is still fixed, though I may pull this off at some point and see about soldering things together. For now, as it feels well secured, I made some marks on it and am calling it good until I can find another one to mess with.

Up at the top, you’ll find the ignition coil, and it’s easy enough to replace. Just pull all the connections off, unscrew the screws on either side, and…

The whole thing comes out! The only “gotcha” to be aware of putting things back together is the ring terminal - this needs to be sandwiched between the coil and the engine block if you want your ignition to work. Otherwise, put the new coil in and go.

If you can’t find a coil, there’s a way to use a Harley coil as well - it mounts on top of the engine. But I’ll only get there if I have to…
Ural Maintenance
There’s a saying about Urals, especially the older ones: “It’s always something simple. But it’s always something.” This is my bike, in a nutshell. There is no shortage of things that need doing. It’s a good way to spend time, because all those things are reasonably easy to do.
But, again, the newer ones should need less of this particular sort of hacking. They come with the nicer stuff I’ve been upgrading to. Hopefully this gives you an idea of life with an older Ural. Should something catastrophic fail, I’d certainly consider a newer one - but until that happens, this is my daily driver, and I’ve no particular objections to the amount of work it requires!
Comments
Comments are handled on my Discourse forum - you'll need to create an account there to post comments.If you've found this post useful, insightful, or informative, why not support me on Ko-fi? And if you'd like to be notified of new posts (I post every two weeks), you can follow my blog via email! Of course, if you like RSS, I support that too.