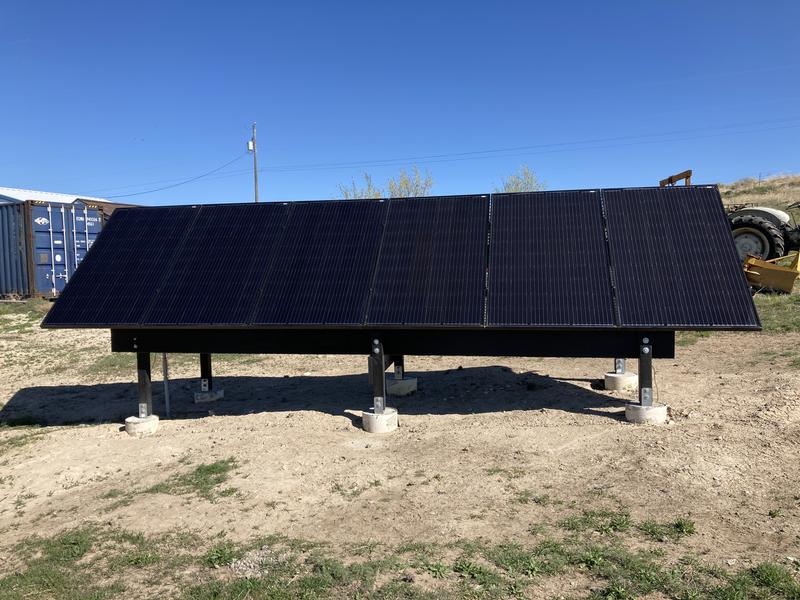
This post covers what should have been the last major part of the project - the south frame for an extra few panels aimed, hopefully not too surprisingly, to the south! Of course, that wasn’t the case. But I’ll get there later.

South panels? But East/West?
After working out the amount of panel I needed for my loads, and rounding things based on string voltage limits, I found myself a few panels short of where I wanted to be. Instead of playing with weird additions to the main As, or higher output panels (which would cost quite a bit more than the new old stock I was able to get), I decided to aim a few panels to the south. This also serves to provide a bit more mid-day power that was intended to help with EV charging in the early afternoon (after 2020, that’s no longer really a concern - Before Covid design principles strike again).
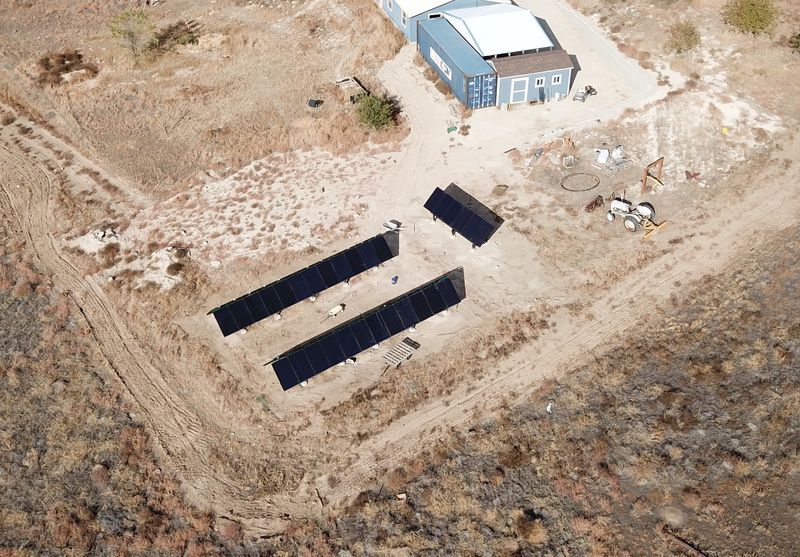
In any case, with 48 panels on the main frames, I’m adding another 6 on the south frame for balance of system production. Nothing fancy, just six panels, facing south, at a 45 degree tilt. This set of frames is to the north of the main set (shouldn’t ever see partial shading from the As), and it was a rather quick build.
Digging the Footings
It’s not a project around here unless I’ve got my tractor out - and this definitely counts as a project! I’ve written about my posthole digger before, and I’ve been making good use of it for solar footings.
A bit of marking string later and it’s time to drill holes!

Unlike the main frame holes, these didn’t require a jackhammer. I hit some hardpan, but it was thin, shallow, and I was able to break it up with nothing more than a metal rod and a sledgehammer. Short spikes of rebar work great for shallow hardpan. And, like before, once I got through the hardpan, it was fairly easy digging.
With all six holes dug, it looks like a giant pissed off gopher has come through my property dead set on proving it knows geometry. The dust is a very fine powder as it comes out, and has reminded more than one person of Clarke’s “A Fall of Moondust.”

Footings are the same as elsewhere - concrete tubes in the ground. I’m using the wooden tube holders I built for the big As here - I just use four screws to hold the tubes in place and level as I fill them with concrete. Good fun…

With the tubes inserted into the ground, it’s time to fill them with concrete. Since this is a small set, I didn’t bother with a work day and the corresponding pizzas. My wife and I got this done fairly quickly, with some limited assistance from the kids. I’ve not convinced myself that a 2 year old and 5 year old are really well suited to concrete work…
I’m certainly better at concrete work than I was at the start of 2020 - at least if the work is footings!

One of the major changes I made, as compared to the big A-frames, is that I decided not to worry about leveling the footings relative to each other. The front row is lower than the back row, and they’re not level (side to side) either. Instead of having the footings sticking way up to level things, I just decided to use the length of the uprights to handle leveling the frames. This means somewhat less concrete, and somewhat more 4x4 - which I’d say is cheaper than more concrete, but only if you are doing this before lumber prices went crazy…
Once the concrete is set, rent a hammer drill, punch holes in, and epoxy the bolts in. I got smart, though - instead of driving the ground rods with a sledgehammer, I paid the extra few dollars, rented a ground rod driving bit, and drove the ground rods for this set of panels with the hammer drill! SO much easier than using a sledgehammer for the bulk of it - though, with our underground rocks, I still had to use the sledgehammer a bit to drive the rods through some tough spots.
Seriously. Ground rod driver bits and a rotary hammer are worth the rental cost 10x over. Driving a ton of ground rods with a sledgehammer sucks, driving them with a rotary hammer is far, far nicer.

Once again, I’ve driven ground rods at either end of the frame. I don’t think my pile of dirt is amazing for grounding, and I’d rather have more ground rod than lose electronics to static buildup during a storm. In terms of total project cost, ground rods are a (g)rounding error. I’ve got some surge protectors that will be dumping overvoltage into the ground system, and I’d like them to be able to dump effectively.

Installing the Uprights and Beams
With the bolts in, I cut the front uprights based on some fancy measurements with a string and level. The uprights aren’t all the same length. It’s a hair more complex this way, but prevents the concrete pilings from sticking way out like some are on the big A-frames. Like before, I bored the holes on the drill press to make sure everything is straight before putting them up (having proved on my office frames that I cannot eyeball a straight hole for something like this).

Yet again, the desired alignment of my piling holes didn’t quite line up with the string marks after a bunch of ancient machinery went pounding away and bouncing off rocks, so the far post is on the other side from where it was intended to be. This doesn’t impact anything structurally, but it means that I don’t have a hole bored very close to the edge of a piling - which does matter structurally.

Like the other rails for the big A-frames, I built this double width beam in place (except I only had two pieces of wood involved). Line up one end of one 2x10, drill a hole all the way through it (you can see the long auger bit on the drill at the bottom), run a bolt through, align the other board, repeat. Now both boards are on a pivot, and it’s easy to bring the whole setup up and secure the other end. Run down the center with glue and clamps, screwing it together as you go, then when you’re finished, bore the rest of the holes and tighten the bolts down. Quick, easy, and after I’d fought with the big A-frames, really simple!

The back is much the same as the front, except that I just used one of my diagonals to mark the right height for the rear uprights. Another set of beams will run across, and the rail support diagonals will sit on them. The front cut leaves a bit less meat than I’d prefer in the supporting section of the wood, but it beats leaving a large overhang, and I have enough wood in this frame that I’m not terribly concerned about the strength - it’s nicely overbuilt. If I ever do see any cracking, I can just add doublers on either side and add yet more strength - but the rafter hangers will add some strength as well and this thing is rather substantially overbuilt.
I’ve not bored the holes in the 4x4 - I’m just using a clamp at the bottom to keep them in place while I work out lengths.

Cut the uprights, bore the uprights, paint the uprights, mount the uprights, add another crossmember. Same as the front, just a bit more annoying due to height. Yes, my projects tend to be massive woodworking assemblies, and this is no exception!

Some sanding, some paint, and some caulk along the top, and they’re ready to receive the crossmembers! Somewhere during this project, I learned about the joys of using huge rollers to paint stuff like this, and the painting got so much faster!

Rail Supports at 45 Degrees
With the main frame rails done, I set about installing the supports for the Iron Ridge rails.
I learned my lesson about birdsmouth cuts on the house A-frames. Just mark the cuts, do the first part with a circular saw, and finish with a small reciprocating saw. No point in making it more complex than it has to be, and it’s trivial to spend far, far more time trying to figure out how to do it quickly than it takes to just do it.
With all the supports cut, I sanded them and got a coat of paint on. Again, large rollers are a really good idea for these sort of projects - they’re far faster than smaller rollers or brushes. I typically paint as much as I can on one side, then come back either about 6h later to paint the other side, or the next day (depending on time and the overnight forecast - no point in subjecting fresh paint to dew).

Installing them is roughly the same as for the As on the main frames - put them in place and then drive screws into the rafter ties in sufficient quantity to make sure that nothing moves or will ever move. The gap between the front and rear rail in the center was a bit more than I wanted, so I used a random ratchet strap laying around to help hold the beams tightly against the cuts in the crossmembers while I screwed them in place. Once they’re in, nothing is moving anywhere, and over time the wood will relax into the desired position.
Why six supports? Mostly because I cut them out of 3x 10’ pieces of lumber and I saw no harm in adding more. I really, really don’t want to rebuild these things in 30 years.

I knew that the “high” end would need some added support to keep it from swinging back and forth, so I added a couple crossmembers between the front and rear uprights to add strength. After adding those two, the structure didn’t move, so I decided the far end didn’t really need one. It would have been down at the very bottom. You may notice a trench coming up to the end - that’s for the conduit!

Rails and Panels
I’ve gone into more detail on mounting the rails elsewhere, but this one was quick and easy! Install the L-feet, mount two rails, secure them in place. Yes, they’re long - but I can far more easily cut them to length once the panels are installed than having to deal with the last half inch beforehand.

For such a short run of panels like this, alignment really isn’t critical. We got the center panels in place and straight, then just went out to the sides! With two people, it’s not too bad. A third person is helpful, and four people is just overkill for mounting panels on a ground mount system like this.

I talked a bit more about the Iron Ridge fastening equipment in a previous post, but these slick gizmos are how the panels get secured. These “umbrella cap” bolts clamp down on the panel sides, cutting into the anodized finish to create solid grounding between the panels and the rails. The whole Iron Ridge thing is very, very slick, and I’d wholeheartedly encourage it if you need to mount panels!

Wiring and Finger Guards
Just like on the large frames, the wiring has to be protected from fingers. The whole thing is wired up in much the same way, with a smaller passthrough box up high to transition the PV wire into conduit.
After playing around a bit, I figured out a way to route the plastic mesh that would give a nice gap between the mesh and the wiring, and stapled/zip-tied it in place. Like this!

Labeling the Equipment
Finally, before inspections, I had to put the proper labels on the equipment. These are specified in the plans I submitted for review, so the process is easy: Install labels as marked in the plans.
I ordered some stock labels from PVLabels.com, had a few custom ones made, and after carefully cleaning the metal, applied them!
The inverters are labeled with the proper bits and pieces, including operating voltages and currents (per string). The conduit running up into the inverters is labeled as well with the proper markings to indicate that it’s DC PV and you shouldn’t cut it.

And the other end boxes are labeled as well. The touch-safe fuse holders I have at the panel ends are not rated to break DC current - they’re likely to arc and make your day really interesting if you try. If I need to work on the DC wiring, I can use the inverter disconnect to safely break the current, then open the fuses out here to de-energize the wiring. If I have to work on the panels, I can open an MC4 connector (which can’t be opened under load either) to de-energize them. Or I can just work at night.

With all that done, it’s time for inspections. And permission to operate! And revocation of permission to operate. And rework. And more inspections. And then operating again!

Comments
Comments are handled on my Discourse forum - you'll need to create an account there to post comments.If you've found this post useful, insightful, or informative, why not support me on Ko-fi? And if you'd like to be notified of new posts (I post every two weeks), you can follow my blog via email! Of course, if you like RSS, I support that too.
